

Create a Scene
User Manual
Contents
A Smart Home That Welcomes You
Control Your Home With A Smart Control Button
Turn On The Heater Automatically
Welcome to Cygnett Smart Home
Cygnett Smart Home is an ever-expanding collection of connected home products and certified to work with Google Home Assistant, Amazon Alexa and Apple HomeKit.
Synonymous for creating better digital experiences through design and innovation, Cygnett Smart Home affords you the convenience and freedom to connect your appliances, lighting, climate control and security to a centralised app.
What Can I Do With Scenes?
By creating a scene in the Cygnett Smart app, you’ll be able to get a group of devices to turn on or off in your home, based on an automation or manual selection – a set of condition(s) must be met for an automation to occur. Setting up your first scene is your first step in creating a smart home. There are many different scenes you can create, however the purposes of this User Manual; we will be covering the following:
- Turning on your lounge room light1 when you open the front door2
- Turning on your lounge room light1 and heater3 when you single press the Smart Control Button4
- Turning on your lounge room light1 when motion5 is detected
- Turning on the heater3 when the room temperature6 is less than 15°C
- Manually turning off the lounge room light1 and heater3
Please note that these scene automations require Cygnett’s range of Smart Home products to operate successfully. Scene examples outlined in this User Manual and not limited to these, so please feel free to experiment in your scenes.
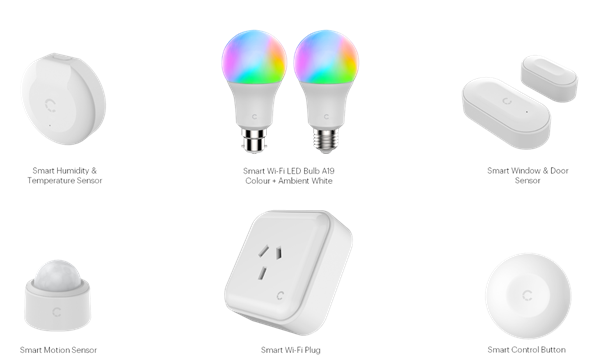
1Smart Wi-Fi LED Bulb A19 Colour + Ambient White, 2Smart Window & Door Sensor, 3Smart Wi-Fi Plug, 4Smart Control Button, 5Smart Motion Sensor, 6Smart Humidity & Temperature Sensor. 2,4,5,6Requires the Smart Hub + IR Remote Control to function.
There are three different ways to activate your scene – Tap to run, timer, or through a trigger device.
Tap To Run
A tap to run automation allows you to change the state of your smart devices through a manual selection in the Scene tab.
Timer
The timer will countdown from the time that you have set and will activate the scene after the selected time has elapsed.
Trigger Device
The trigger device is the device that will activate a scene automation. The trigger device could be any Cygnett’s range of smart home devices.
Getting Started
Please that you have already set up the smart devices you would like to involve in an automation. In the below Cygnett Smart Home Screen, we have setup the: Smart Wi-Fi LED Bulb A19 Colour + Ambient White, Smart Wi-Fi Plug, Smart Window & Door Sensor, Smart Control Button, Smart Motion Sensor, Smart Humidity & Temperature Sensor and the Smart Hub + IR Remote Control.
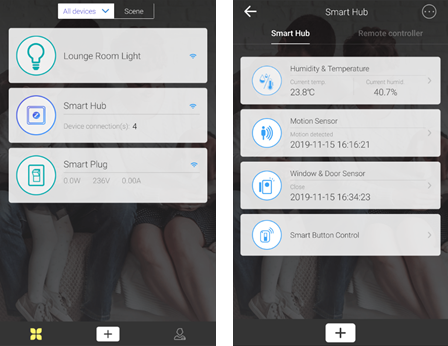
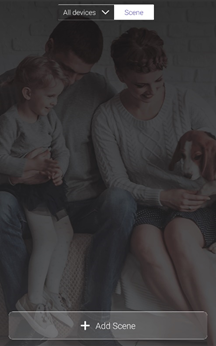
To create a scene, tap on the Scene at the top of Cygnett Smart Home Screen. You will be prompted with a screen shown below, tap Add Scene to begin setting up your scene.
A Smart Home That Welcomes You
Have you ever entered your dark home with your hands full, unable to turn on the lights? This will no longer be a problem if you set up the scene below. This scene automation will turn on your lights as soon as you open the front door.
Requirements
1x Smart Wi-Fi LED Bulb A19 Colour + Ambient White
Installed in any B22/E27 socket in your home (i.e. lounge room) and paired with the Cygnett Smart app.
1x Smart Window & Door Sensor
Installed on your front door (or any door) and paired with the Smart Hub + IR Remote Control in the Cygnett Smart app.
1x Smart Hub + IR Remote Control
Connected to a USB-A 5W power supply and paired with the Cygnett Smart app.
For instructions on how to install the above smart devices, please refer to the User Manuals at Cygnett Care – support.cygnett.com
Name Your Scene
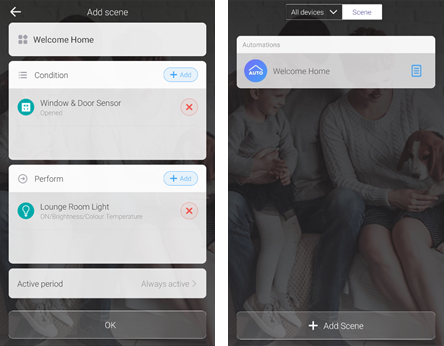
First, give your scene a name – for this example, we will name it ‘Welcome Home’.

Conditions
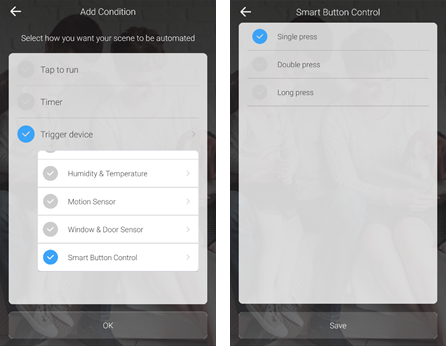
In order for your scene to be triggered automatically, a set of conditions must be met. These conditions can be added and removed based on your preference under the Condition section. To begin adding a condition, tap Add. You will be presented with a screen similar to the below.

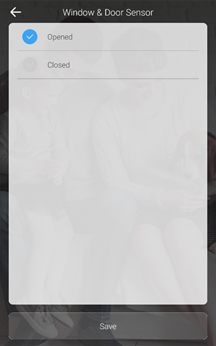
Select Trigger device and tap Window & Door Sensor. This will display the states in which the Window & Door Sensor can be in to trigger the activation. Tap Opened and Select Save.
Perform
In the Perform Section, tap Add, and the below screen will be shown. Select Lounge Room Light.
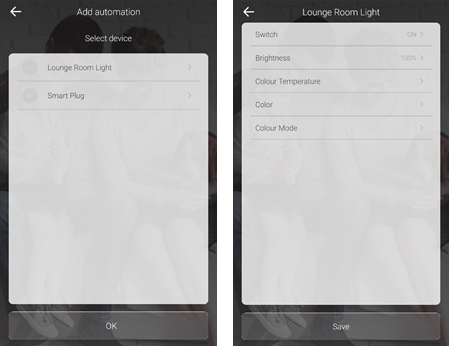
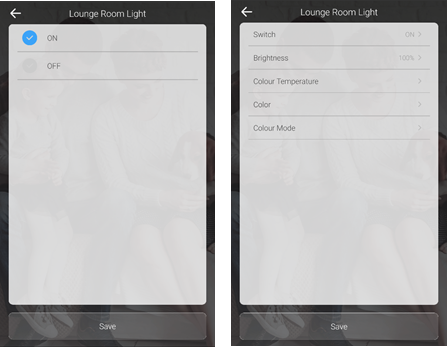
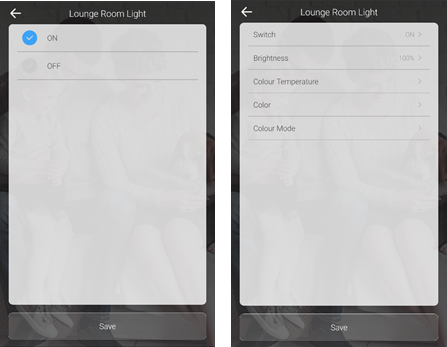
Select Switch to change the state of your lounge room light when the front door is opened. Tap Save once you have completed your selection.
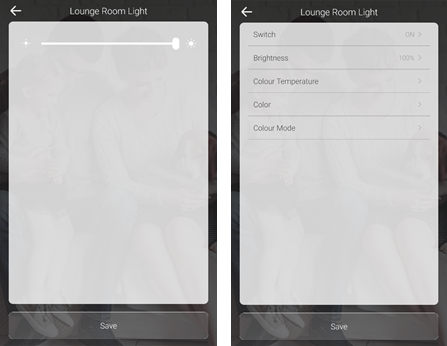
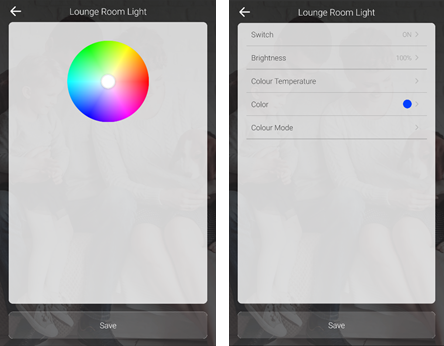
Select Brightness to adjust the brightness of your lounge room light when the front door is opened. Tap Save once you have completed your selection. For max brightness, adjust the slider to the right, and vice versa for dimmer lighting.
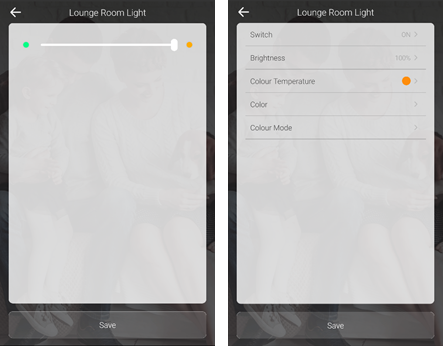
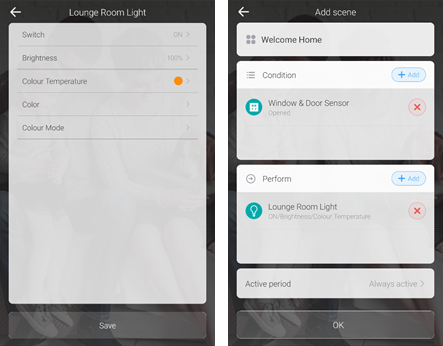
To select the tone of white when your scene is activated (i.e. front door is opened), tap Colour Temperature. The below screen will show. Adjust the slider to the right for a warm white, and to the left for a cool white. Tap Save once you have completed your selection.
Alternatively, if you would like a certain colour in your lounge room when you come home, select Colour, and you will be prompted with the below screen containing a colour wheel. Make your selection of colour and tap Save. For this example, we have selected blue.
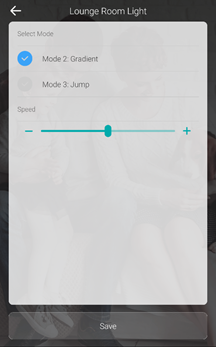
Also, you can animate the colours in your lounge room light by selecting Colour Mode. The smart bulb can be set to different modes – Gradient and Jump. These modes will cycle between colours in the colour wheel. Gradient has an animation of smooth transitions between the colours, whilst Jump has a strobe-like transition. You can also adjust the slider to change the speed of transitions. Tap Save once you have completed your selection.
Once you are happy with your selections, tap Save.
Active Period
In the Add scene page towards the bottom, there is a section called Active period. This page allows you to adjust when your scene would be automatically activated. You can choose what days of the week you would like your scene to be activate, or to be automated every day. Once you have selected your days, tap OK.
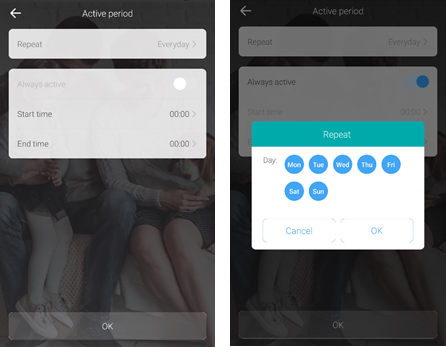
Also, you can indicate the time in which you would like your scenes to be automated. Tap on the Start time to indicate the time you would like your scenes to be active; then close off the time range by tapping End time and selecting the time. Tap OK when you have completed your selections.

In this example, we have selected the Active period to be Always active, so that every time when the front door is opened, the lounge room lights will turn on to a warm white at maximum brightness. Tap OK when complete.
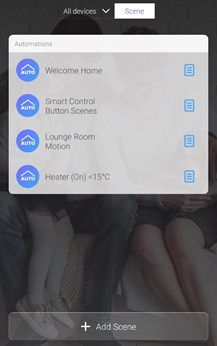
Your Welcome Home scene will now appear on the Scene page. Click on the icon to access logs of when your scene has been activated.
Control Your Home With A Smart Control Button
Our smart phones are with us the majority of the time, however there may be that odd chance where your phone is not easily accessible, and this is where the Smart Control Button excels in your smart home ecosystem.
Your Cygnett Smart Control Button can save up to 3 pre-set scenes in the Cygnett Smart app. Your scenes can be activated by single clicking, double clicking or long pressing the Smart Control Button.
In this example, we will be turning on the lounge room light and the smart plug with a single click of the Smart Control Button. Plug your electrical appliances (i.e. fans, heaters, lamps, etc.) into the smart plug so it will turn on along with the lounge room light – the possibilities are endless.
Requirements
1x Smart Wi-Fi LED Bulb A19 Colour + Ambient White
Installed in any B22/E27 socket in your home (i.e. lounge room) and paired with the Cygnett Smart app.
1x Smart Wi-Fi Smart Plug
Installed in any mains powered port in your home and paired with the Cygnett Smart app.
1x Smart Control Button
Paired with the Smart Hub + IR Remote Control in the Cygnett Smart app.
1x Smart Hub + IR Remote Control
Connected to a USB-A 5W power supply and paired with the Cygnett Smart app.
For instructions on how to install the above smart devices, please refer to the User Manuals at Cygnett Care – support.cygnett.com
Name Your Scene
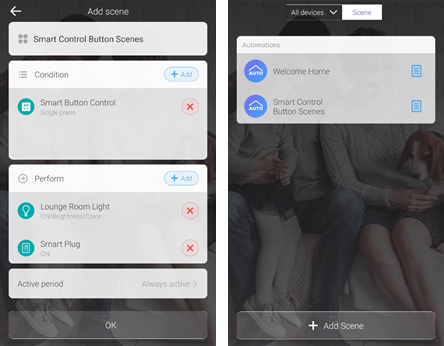
As outlined previously, tap Add Scene on the Scene page. Proceed to give your scene a name; for this, we have named it ‘Smart Control Button Scenes’.

Conditions
In order for your scene to be triggered by the Smart Control Button, you must choose whether it would be activated by a single click, double click or long press. To begin, tap Add and you will be presented with a screen similar to the below. For this example, we will be selecting single press as a trigger for our scene. Tap Save when you have completed your selection.
Perform
In the Perform Section, tap Add, and the below screen will be shown – select Lounge Room Light.
For instructions on how to set the state, colour and mode of your Lounge Room Light, please refer to sub-section, Perform, under section, A Smart Home That Welcomes You.
Similarly, to select an Active Period for your Smart Control Button, please refer to sub-section, Active Period, under section, A Smart Home That Welcomes You.
After you have made selections for your Lounge Room Light and Smart Plug, tap OK and your Scene page should like the below. Your Smart Control Button scene will now appear on the Scene page. Click on the  icon to access logs of when your scene has been activated.
Motion-based Light Automation
Walk into your room with style with Cygnett’s Smart Motion Sensor. In this example, we will be turning on your lounge room light based on motion detection.
Requirements
1x Smart Wi-Fi LED Bulb A19 Colour + Ambient White
Installed in any B22/E27 socket in your home (i.e. lounge room) and paired with the Cygnett Smart app.
1x Smart Motion Sensor
Paired with the Smart Hub + IR Remote Control in the Cygnett Smart app.
1x Smart Hub + IR Remote Control
Connected to a USB-A 5W power supply and paired with the Cygnett Smart app.
For instructions on how to install the above smart devices, please refer to the User Manuals at Cygnett Care – support.cygnett.com
Name Your Scene
First, give your name a scene – for this example, we will name it Lounge Room Motion.
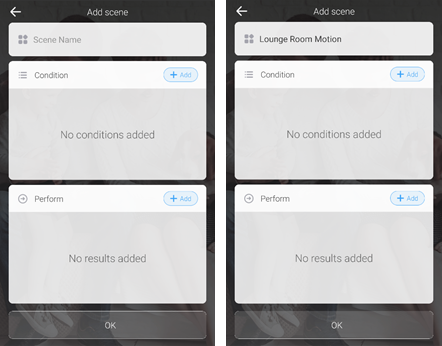
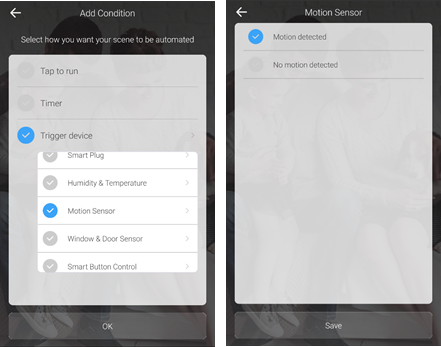
Conditions
In order for your scene to be triggered by the Smart Motion Sensor, you must choose whether it would be activated by motion or no motion. For this example, we will be selection ‘Motion detected’. Please note that ‘No motion detected’ refers to motion not being detected for more than 1 minute. Tap Save you have completed your selection.
Perform
In the Perform section, tap Add and select Lounge Room Light.
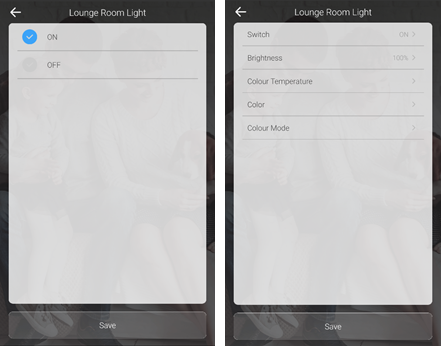
For instructions on how to set the state, colour and mode of your Lounge Room Light, please refer to sub-section, Perform, under section, A Smart Home That Welcomes You.
Similarly, to select an Active Period for your Smart Motion Sensor, please refer to sub-section, Active Period, under section, A Smart Home That Welcomes You.
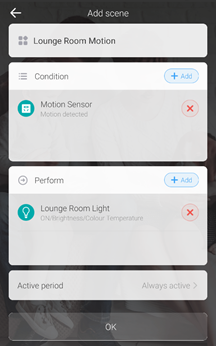
After you have made selections for your Lounge Room Light, tap OK and your Scene page should like the below. Your Smart Control Button scene will now appear on the Scene page. Click on the  icon to access logs of when your scene has been activated.
Turn On The Heater Automatically
If you enjoy a warm home, you can turn on your heater if it reaches below a certain room temperature using your Smart Humidity & Temperature Sensor and Smart Wi-Fi Plug. Your Smart Humidity & Temperature Sensor can trigger scenes based on humidity and/or temperature.
In this example, we will be demonstrating how to turn on your heater (connected to the Smart Wi-Fi Plug) when it reaches below 15°C.
Requirements
1x Smart Wi-Fi Smart Plug
Installed in any mains powered port in your home and paired with the Cygnett Smart app.
1x Smart Humidity & Temperature Sensor
Paired with the Smart Hub + IR Remote Control in the Cygnett Smart app.
1x Smart Hub + IR Remote Control
Connected to a USB-A 5W power supply and paired with the Cygnett Smart app.
For instructions on how to install the above smart devices, please refer to the User Manuals at Cygnett Care – support.cygnett.com
Name Your Scene
First, give your name a scene – for this example, we will be naming it ‘Heater (On) <15°C’
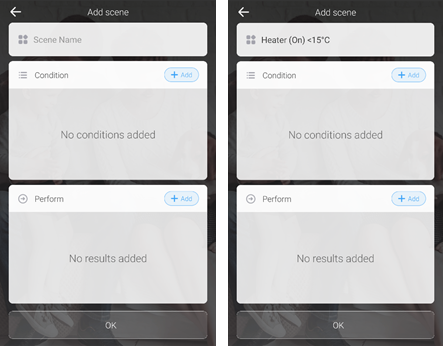
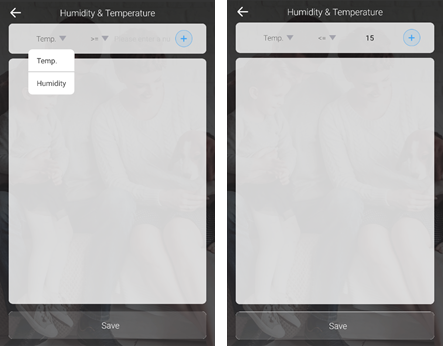
Conditions
In order for your scene to be triggered the Smart Humidity & Temperature Sensor, you must select the temperature/humidity range. The below image shows the options available to you. You can select the temperature or humidity via the dropdown box. In the dropdown box to the right of it, ‘>=’ refers to greater than or equal to, whilst ‘<=’ refers to less than or equal to. Add your desired temperature/humidity level, then tap the + icon. Tap Save when you have completed your selection(s).
Perform
In the Perform section, tap Add. Select your Smart Plug.

Select the state you would like the smart plug to be in when the temperature is less than 15°C – in this case, we will be selecting On. Tap Save when you have completed your selection.
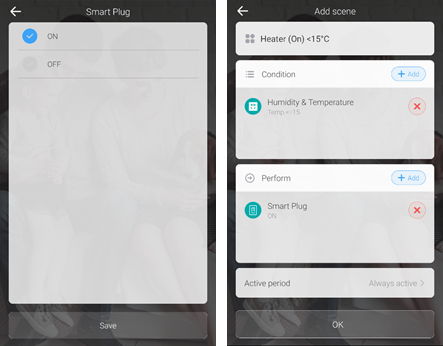
To select an Active Period for your Smart Motion Sensor, please refer to sub-section, Active Period, under section, A Smart Home That Welcomes You.
After you have made selections for your Lounge Room Light, tap OK and your Scene page should like the below. Your Smart Control Button scene will now appear on the Scene page. Click on the  icon to access logs of when your scene has been activated.
Account Settings
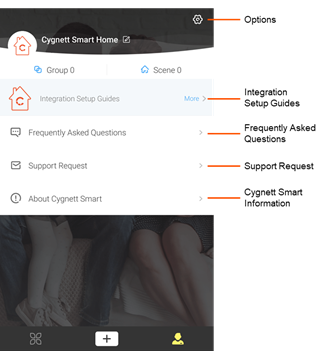
Options
In the Options scree, you can change your password under ‘Security’ and following the in-app instructions. You can also select available languages in your region under ‘Language’ and elect to turn on or off your haptic feedback under ‘Vibration Switch’. You also have the option to log out of your Cygnett Smart app by tapping ‘Log Out’.
Integration Setup Guides
In this section, you can find instructions on how to integrate your Cygnett Smart Home devices with Amazon Alexa, Google Assistant and Apple HomeKit.
Frequently Asked Questions
The most frequently asked questions are all listed here for your troubleshooting needs. This page is constantly updated, so you will receive the most up-to-date news and feedback.
Support Request
This is the direct link between you and our dedicated team at Cygnett Care who will answer your questions and concerns regarding your Cygnett Smart Home device.
To download a copy of this user manual, please click the below link.
Cygnett and the Cygnett logo are trademarks of Cygnett Pty Ltd. Google, Android and Google Play are trademarks of Google LLC. Other brands and product names are trademarks or registered trademarks of their respective holders. Made in China. Cygnett takes no responsibility for damages caused by incorrect use of its products. Tested to comply with AU/NZ safety standards.
© 2019 Cygnett PTY LTD.
Cygnett Head Office
858 Lorimer Street, Port Melbourne, Victoria, 3207, Australia